Sunday, August 25, 2013

Improvisational Weekend Breakfasts

On Saturday or Sunday morning, I like to make pancakes or french toast with whatever ingredients I have lying around.


Sometimes it's apple cinnamon pancakes with honey ricotta.


Sometimes it's almond coconut pancakes with balsamic honey strawberry drizzle.


And sometimes it's Pumpkin Spice Wheat and Oatmeal Pancakes with banana and apple slices, topped with pumpkin cream cheese and pumpkin butter. (like whoa.)


This morning I have plums. 

But, first I need my tea.


Okay, onward.
I sliced 2 plums, and sauteed them in about 1 Tbsp or less of butter, then added a big Tbsp of honey.


For the French Toast, I soaked 2 pieces of wheat bread in a mixture of 1 egg, 1/4c milk, and a dash of vanilla extract, almond extract, and cinnamon. Oh, and I sprinkled in about 1 Tsp of ground almond meal for some added protein and flavor.


Grill up the french toast, top with sauteed plums and their sauce.


Then, drizzle a tiny bit of mini-syrup you snagged from the Bellagio hotel room service, just because you have it on hand, and the bottle is so dang cute.


Then, finish taking photos, start eating, and decide to sprinkle on a bit of unsweetened coconut.


Like I said. Improvise!


Happy Weekend!
So There.

Linked up with The Tasty Fork & Wine and Glue!

Thursday, August 15, 2013

How To Peel a Mango - Step by Step Tutorial with Photos


I hate that feeling when you want to buy a food item, but have no idea how to prepare it, so you avoid it! What a bummer!
I was reminded (Hi Daddy!) that mangos can be really frustrating to open, and I thought I'd share a detailed tutorial on how I finally figured out the best way to peel a mango, without ending up with a pile o' mess, and very little salvageable fruit!

The trick?  Open it like an avocado!

First you have to learn which way to hold the mango, then score it all the way around, then twist to release from the giant pit.
Do this on both sides, and you are left with two halves of fruit, plus the whole pit in a middle third piece.
Then, scoop flesh out of each half, like an avocado!

Check it out!

Start with a good paring knife.


Stand the mango upright, so the 'sides' are facing you, and the 'front and back' are to the left and right. Does that make sense?? The front and back are the wide sides, and the 'sides' are the shorter edge sides.
This step is super important, because this is the way the pit faces inside.
If you turn it the other way and cut, that is when you end up with very little fruit, and said pile o' mess.


(semi-side angle of same photo)


(side view of same photo)

Now, place your knife just to the left of the center and cut straight down.
If you immediately hit the pit, stop, and start over, a bit further out to the left.

It is possible you will be able to cut straight through, which is fine!

If not, and you hit the pit about halfway down, keep the knife in, and rotate the fruit, so you are essentially scoring it all the way around.


Basically, sometimes the pit is flat on the sides, and sometimes it is more rounded. If it is flat, you should be able to cut straight down next to it, but if it is rounded you will hit the widest part of it halfway down, and then you should use the score and rotate method.
This latter method is similar to cutting open an avocado, where the pit is round!


Using the avocado method, this mango half should rotate and twist right off, and you can see a little indent where it was attached to the pit.


Side one, done!


Now, repeat on the other side!

Rotate the remaining fruit 180 degrees, and again, start cutting straight down, slightly to the left of the center.
Like before, if you hit the pit right away, start over again slightly more to the left.  If you hit it about halfway down, just score and rotate, then twist the fruit off of the middle put section.


You are now left with two whole sides of mango fruit, and that whole middle section is the pit!


Now, with a big mango like this one, there is some fruit left on the pit piece, on the sides and bottom. The pit pretty much goes all the way to the top, so there is no extra fruit at the top.

You can trim small, curved pieces off of the left, right, and bottom if you wish.


There! Now you truly have all the fruit off of the pit, and have wasted nothing!


But wait!!
Phase two.
Now, you peel the mango away from the skin.

There are two possible methods here.
And both are methods used to get avocado out of the peel.

You can score it, as shown below, cutting lines vertically and then horizontally, almost all the way down, but not cutting through the peel, making little squares.

Then, use a big spoon to scoop all the little mango squares out of the skin.
The flesh is pretty stuck to the peel, so it might take a bit of muscle, but you got this!


I find that, because it is rather stuck to the skin, the squares do not end up as cute and perfect as you initially had hoped.
Though, still tasty!


For this reason, I prefer method two.

Skip the scoring, and just go around the whole edge, right where the flesh connects to the skin with a large spoon.


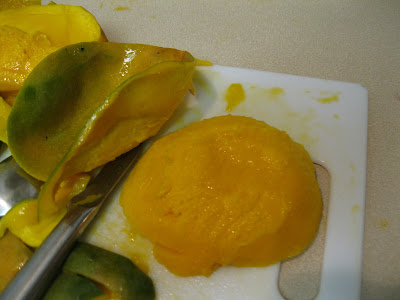
After the edges are scored, use the spoon to lift the mango away from the skin.
If it is pretty stuck, I like to flip it over onto the cutting board, and pull the skin back, off the fruit, which seems to give better leverage, than the spoon.


Keep pulling the skin back...


And, done!!


Now, you have two perfect mango halves, which you can slice as thin as you like, into slices, kind of like you would with a melon.
Or, again, like an avocado!


Remember these guys?? The tiny edge and bottom pieces we cut off of the pit last?
You can peel the skin off of these a you would a melon slice, as well.
These tiny pieces are usually my mid-cutting snack! A reward for this work!


And now you are done!!
We have wasted no fruit, we have no pile o' mess. And we have lovely, delicious, pretty mango squares or slices to enjoy!

Cutting a mango. It can be done!
So There.


Monday, August 12, 2013

Daphne's, It's What's For Dinner

Daphne's California Greek Restaurant gave me a gift card to taste and review their new menu items.
Uh, hell yes, I love Daphne's.  And their new Mini-Pita Trio is adorable and delish!!


The Trio comes with three different flavors of pitas: one Greek, one California, and one Cali-Greek.

The Greek-style Mini-Pita is a traditional gyros with meat, onion, and tzatziki sauce.
I actually meant to substitute falafel in for the gyros meat on this one, but forgot. One thing Daphne's definitely is, is vegetarian friendly. They offer to substitute falafel or Gardenburger in any of their pita sandwiches, salads, or meals.
My sister tried this one, and said it was really excellent.


The California Mini-Pita is almost Mexican style, with grilled chicken, topped with guacamole, salsa Fresca, and Jalapeno bacon.  This new-for-Daphne's flavor combo was really good, and, who doesn't love guacamole?!


The Cali-Greek Mini-Pita combines flavors from both the other Pitas, and is chicken, topped with tzatziki sauce, salsa Fresca, feta cheese, and Kalamata olives.
This one was actually my favorite!


The best part about Daphne's pitas is the pita bread itself.  OMG, it is sooo good! Pillowy, warm, fresh pita...yum!

So, to round out our dinner, we went all out with the Daphne's menu.


We began with their Starters sampler appetizer, with is cucumber slices and pita chips with a trio of dips: the guacamole, hummus, and their fire feta spicy cheese dip.


Then, we went for some spanakopita. This was my favorite thing I ate all night, besides the Cali-Greek Mini-Pita! They are just so good!! Layers of flaky dough, with melted feta cheese and spinach, all baked up into a pastry pocket. Did I mention I love Greek food?? Yeah.


So, then, we also shared a Gardenburger Pita Burger, with hummus, which was also bomb. Seriously, their pita is amazing.
My sister got another one of these to go, with the fire feta dip instead of hummus, for lunch tomorrow!! I don't blame her.

Oh, don't worry, then we saved room for dessert! Barely.
When you eat at Daphne's, you have to get a piece of the baklava, a flaky dough pastry with honey and nuts. That description did not do it justice. Damn. Just go try one!


The great thing about Daphne's, too, is their prices!
Some of the meal plates or salads are a medium range, like $8, lunch...but the Pita Burger, and all the appetizers and desserts are so reasonably priced!! You can definitely afford to splurge on a starter or appetizer, and a dessert bite.  I love that.  It makes it feel more like a complete meal. They have all kinds of appetizers, from soup, to salad, to the hummus plate. And don't forget the spanakopita!

All in all, I have always loved Daphne's, but I am totally loving their new California-Greek twist, especially because it includes guacamole! Yum!

The next time you are out for lunch or dinner, try out Daphne's California Greek new Mini-Pitas, and seriously, don't forget the pastries!


AddThis