Showing posts with label Holiday. Show all posts

Tuesday, November 24, 2015

Traditional Stuffing Recipe with Apples, Celery, & Sage

Went to my annual Friendgiving dinner on Sunday. So much fun!

I ate pumpkin and apple pies both with Cool Whip...which I think I entirely blocked out for so long until now, and now all I can think about is eating more Cool Whip! Yum, you guys.
Sorry, Oil, or Cream commercial. Today, oil won ;)

Anyway, I brought stuffing and rolls.
I love making stuffing! It is so easy. I like to add egg, and a little milk sometimes, in additional to the stock, so it turns out with a good texture, a little like a bread pudding.
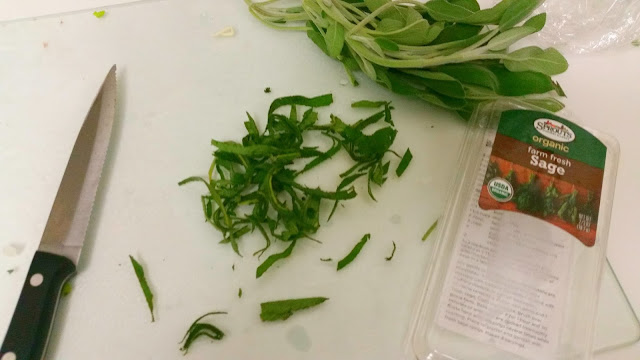
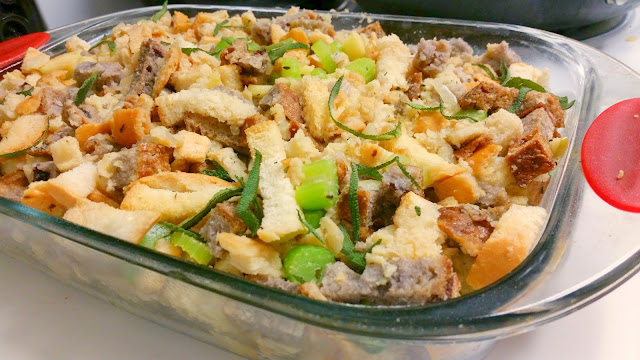
I added apples, celery and fresh sage.

I found an awesome blend at Sprouts of dried, cubed bread marked for use in stuffing. Perfect! It was the best blend of white, sourdough, dark (whatever the 'brown bread' is at Cheesecake Factory. You know what I'm talking about!), and some sort of raisin bread which was amazing!
Saved me from tearing and drying bread. And had such a better taste and texture than the usual stuffing mix blend.  But you can use anything! I have heard brioche is amazing.

Traditional Stuffing Recipe with Apples, Celery, & Sage
Recipe

Ingredients:

10 cups (approx) fresh bread, cubed, and toasted or left out to get stale - or - pre-dried crouton-like     mix from store ( About 1.5 loaves of fresh bread)
3-4 cups vegetable stock (chicken or turkey stock are great, too) (Use only as needed)
3 Tbsp butter
1/2 small onion, finely chopped
1 clove garlic, minced
1 medium apple, chopped
4 ribs of celery, chopped
6 fresh sage leaves, sliced
2 eggs
1/2 cup milk (Optional, sub in for some of the stock)
salt
pepper


Directions:

First off, you'll want to start out with a large pot, or, alternatively, have a large bowl on hand to pour everything in to later on.
Saute onions in butter on medium-low heat for 10 minutes until translucent. (not browned)
Add garlic and salt and pepper.
Add apples and celery and continue to saute until slightly softened.
Add about half the stock, 1-2 cups, and stir.

turkey, pumpkin

turkey pumpkin

turkey pumpkin


Crack the eggs into a small bowl, and add 3 Tbsp of the warmed broth into the eggs, and whisk. This tempers them, so they don't scramble when you add them in to the rest of the stock. Sub in a bit of milk here, if desired, in with the egg mixture. This gives a bit more of a bread pudding finish to the stuffing.

This is where you'll need this pot we've been using to be pretty large, or else, when it gets full, transfer everything into an even larger bowl to finish combining, before pouring into baking dish.

But, start adding bread cubes into the pot, and fold in gently. When some have been added, fold in the egg mixture.
Keep adding more stock, and more bread, and folding everything into the apple and celery mixture, until well combined.
Chop the fresh sage leaves (or use dried), and fold those in.

turkey pumpkin

turkey pumpkin

turkey pumpkin


Pour everything into a greased 9" x 13" casserole dish.  Cover with foil.
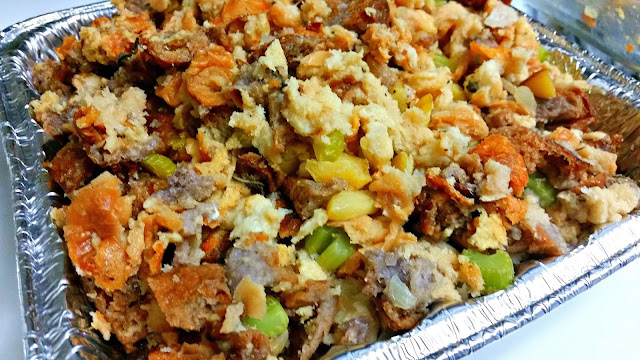
Bake, covered, at 375 degrees for 30 minutes, then uncover, and continue to bake for 20 more minutes, watching that the bread doesn't brown too much.

Voila! Homemade Stuffing!

turkey pumpkin

turkey pumpkin


Monday, February 10, 2014

Champagne Soaked Chocolate Covered Heart-Shaped Strawberries

Though I don't currently have a special someone (accepting applications!), I still love making festive holiday treats, and Valentine's Day is no exception.
My sister came over for a little baking extravaganza - best soux chef ever!! - so I could have some fabulous company, and send her home with some treats to share with her boyfriend.


We combined two different recipes, HERE and HERE, soaking strawberries in champagne, and then forming them into adorable heart shapes, and dipping in chocolate. And they were yum!

The heart shape doesn't fully come through until you cover them in chocolate, so hold out hope until then! Although, I'm not going to lie, some of them turn out butt-shaped. Those ones you can keep for yourself ;)
They all taste the same. Amazing!

What you'll need:
(Quantities based on how many you'd like to make)
Strawberries (smaller ones with only a single point at the bottom work best)
Bottle of Champagne (your choice. Prosecco would work fine, too!)
Toothpicks (1 wooden toothpick for each strawberry)
Chocolate (milk, white, or dark)
Couple tablespoons of oil (vegetable, coconut)


Start by rinsing strawberries well, and cutting straight across the tops, trimming off just the stems.


Toss in a bowl filled with champagne, making sure all the strawberries are covered, and let soak for a couple hours. 


They pick up plenty of champagne flavor-flav in that amount of time. The recipe above recommended overnight, but I think they would get too soggy by then, especially since we are cutting them in half afterwards; you need them to hold their shape still.  
We also decided soaking them whole, instead of already cut in half, worked much better.

Remove from liquid, and pat dry with paper towels.


Cut berries in half, from top to bottom, and keeping the halves paired with each other, lay side by side, and stick a toothpick through the sides to hold them together in a heart shape.


 Some strawberries will look much more heart shaped than others, just depending on their natural shape. You can carve a rounded edge on the outer corners if they need some work. If a strawberry is more oval shaped looking at it from the top, instead of a circle, try cutting it the short way, instead of left to right, to get a better heart shape result.
If that made no sense...use trial and error. You'll figure it out!

Once all the strawberries are strung up on toothpicks, melt some chocolate with a couple tablespoons of vegetable or coconut oil in a double boiler pan (or a heat-proof bowl, over a pot of simmering water, if you don't have a double boiler. I use mine only like 3x a year, but it is worth investing in one!) until smooth and melted.

Dip the berries in the chocolate, using two forks, evenly coating all sides. Tap on the side of the pan to remove excess chocolate, then lay on wax paper to set.
Tip: Put a big sheet of wax, or parchment paper on a cookie sheet, or two, so when you are done dipping, you can easily transport them all directly into the fridge to set up.
Once the chocolate is set, they are ready to eat!


You can also melt some white chocolate, dying pink or red, if you'd like, and drizzle it over the tops of the strawberries.


Or you can get crazy, and pretend you are 5, and draw ladybugs and butterflies and hearts on some.
Like I said: no significant other to impress. Haha. So, doodle on these as much as your lil' heart desires. They all still taste the same!


These are best enjoyed within 24 hours or so. After that, the berries get a bit soggy, and the champagne leaks out.  
I still used the 2-3 day old leftovers, chopped up, on top of pancakes, with peanut butter, this morning!
YUM!

Anyway, these make such a fun treat for your Valentine, friends and family, or just for yourself!
We made quite a few, but you can make a few or as many as you'd like. Just adjust the amount of chocolate melted accordingly. And drink the leftover champagne you didn't use to soak the berries.
Actually, we drank the strawberry essence-ed leftover post-soaking champagne, too. We fancy like that.

Enjoy!


Tuesday, January 3, 2012

Let it Snow, Let it Snow, Let it Snow....

My cousin found this goldmine of a craft tutorial on You Tube, and taught us how to make them at Thanksgiving:

3D Paper Snowflakes


You can just use regular white computer paper, or get fancier printed paper or cardstock, as long as it is printed/colored on both sides.
Then, you just need scissors and either glue, hot glue, or tape.
Watch the video above, but just a few simple cuts and folds and you have a huge, three dimensional snowflake! It makes such a bigger impact than traditional flat paper snowflakes we all made as kids.

Try these!!

I also have it on my Pinterest page, from my cousin's post - she made one out of old sheet music! Beautiful!


http://pinterest.com/pin/90353536243779475/

PS....Pinterest is my newest OBSESSION!!!!
Such the perfect way to organize ALL my craft and recipe ideas.

So there.

Christmas Candy!

Another repeat, but worth repeating!
I made peppermint bark again this year to bring to work and our family Christmas.

2010 Blog Post - Peppermint Bark

Although it was much easier this year with my double boiler!


Ta da...BARK!

Pot Luck Salad, Take 2!

I made this delicious salad again this year for our annual pot luck at work.

2010 Blog Post: Spinach Salad
It is so easy (embarrassingly so...) and always is a big hit!

Check out last year's entry above for the recipe


Hope you all had a great Thanksgiving!

...More Pumpkins!

I saw these apple shaped cupcakes in my calendar version of this book:

http://www.amazon.com/Whats-New-Cupcake

and decided to alter them into mini pumpkin cupcakes for my work Halloween party.

(calendar photo)

(my version...duh)

I dipped a mini doughnut in melted orange frosting and placed it on top of the cupcake.  The stem is made of a piece of a tootsie roll and the leaf is a green apple sour candy.

Then, these got really hard to make, so I topped the rest with candy corn and pumpkin shaped Peeps candies.

Happy Halloween!

See this post Linked up over at High Heels & Grills!

Pumpkins!

.....Yes, I am just getting around to posting about these pumpkins I made for Halloween/Thanksgiving.

Don't judge.

These were the cutest little things ever, and easy to make!


I bought cheap plastic mini pumpkins (don't use real ones, folks, or you can't keep them for next year!) and covered them with festive, fall fabric.
First, I cut a long stripof fabric that was wider and taller than the pumpkin, and used hot glue to attach the fabric into every crease of the pumpkin, as I wrapped it around.
I trimmed the top and bottom so only about an inch or less stuck up, and glued those pieces down, flat to the top, and bottom, respectively.  Then, I cut a round piece to glue on the bottom for a smooth surface.
Finish the top with a green felt tube glued into the middle as the stem!


I also made some oh-so-trendy Chevron stripes on a real, mini white pumpkin with silver and gold paint pens.

Happy Autumn!

Friday, July 1, 2011

Monday, March 21, 2011

Whoopie!


Tried my hand at some whoopie pies for St. Patrick's Day - green velvet cake with cream cheese frosting.

Whoopie pies seem to be becoming pretty popular lately - those, and the similar macaron.
It was hard to find the right consistency for the cake/cookie part;  tried a couple different recipes, and ended up with a batch of pancakes?? first, and the second I had to still add quite a bit of flour to to get them from a cake batter to more of a free standing cookie dough.

Basically a whoopie pie is two round pieces of cake with a creamy filling. But, to make the cake circles on a flat cookie sheet (they make whoopie pie pans just for this problem!!), you have to change the cake batter to more of a cookie dough consistency.
Anyway, they still tasted pretty delicious...the second batch, that is; the first seriously tasted like pancakes!!  Strange.

Here is the recipe I used - Thank you Paula Deen!  But, I had to add quite a bit more flour to the mix, like I mentioned.  I halved this recipe, and once halved, I added about 1/2 cup or more of extra flour. (and I used green food coloring instead of red, duh! Just guessed the amount - dropped in the liquid color until it looked right to me)

Since I tested out 2 different pie recipes, I ended up using the frosting from this recipe blog instead of the one below. It was delicious!!

Cream Cheese Frosting
  • 1 oz package of softened cream cheese
  • 1/4 cup softened butter
  • 1 teaspoon vanilla extract
  • 1 bag powdered sugar (2 lb bag)
  • Milk as needed
Cream together cream cheese, butter and vanilla in a bowl until smooth.   Gradually add in powdered sugar and continue mixing.   I add in milk as needed to get to the desired consistency.

Pie recipe: (Like I said, I halved this recipe) The full recipe is listed below.

Servings: 24 Pies
Prep Time: 20-30 Minutes
Cook Time: 12-15 minutes

Ingredients

For the pies:
3 cups all-purpose flour
1 teaspoon baking soda
2 teaspoons unsweetened cocoa powder
1 1/2 cups canola oil
1 teaspoon white vinegar
One 1-ounce bottle red food coloring
1/2 teaspoon vanilla extract
1 1/2 cups sugar
2 eggs
1 cup buttermilk


For the filling:

5 tablespoons all-purpose flour
1 cup milk
1 cup sugar
8 tablespoons (1 stick) butter, softened
1/2 cup solid vegetable shortening, such as Crisco
1 teaspoon vanilla extract

Directions

Preheat the oven to 350°F. Lightly grease two cookie sheets. Sift the flour, baking soda, and cocoa together. In a separate bowl, combine the oil, vinegar, food coloring, and vanilla.
Using an electric mixer, beat the sugar and eggs together until they turn pale and double in volume. Add the oil mixture and beat to combine. Add the flour mixture and buttermilk alternately in five small additions, starting and ending with the flour.

Drop the batter by teaspoons onto the baking sheets, allowing 1 inch between drops, as the cookies will spread. You’ll be making 48 cookies. Bake until the cookies are firm but not crisp, about 12 minutes. Transfer immediately to racks to cool.
**Mine barely even baked for 7 minutes! Watch them closely!!

To make the filling, put the flour into a medium saucepan and slowly add the milk, whisking until smooth. Set over medium heat and cook, stirring constantly with a whisk, until very thick, about 3 minutes. Allow to cool completely.

Cream the sugar, butter, shortening, and vanilla with an electric mixer. Add the cooled flour mixture and whip until fluffy. Spread onto one cookie and top it with another to make a sandwich; repeat with the remaining cookies and filling. Cover the filled whoopee pies with plastic wrap and store in the refrigerator.
Happy St. Patrick's Day!

Monday, February 7, 2011

Be Mine

I always get excited to do Holiday-themed craft and baking projects with Kylie.
Valentine's Day is no exception.

I took her to the store to pick out valentines to give to her classmates.  We settled on puppy and kitty ones that come with temporary tattoos, as she decided she could not give her first choice of Princess valentines to the boys. (And I wasn't about to buy 2 different packs of 32!)

She addressed about 6 of the "To: and From:" all by herself from her class name list before she got bored.  We will try and finish the rest on Tues and Wed or next weekend :)

Next on our list will be heart shaped cookies next weekend, and making homemade valentines to give to relatives and to hang on the windows as decoration.

But THESE, I am dying to try! My parents got me the coolest calendar for Christmas:


Each month has photos of ridiculously awesome cupcakes, AND then it tells you how to make all the decorations with candy and other things. EXCITED. Who wants a rubber ducky cupcake?!

But for February, it has cupcakes with huge conversation hearts on top!
The cool thing about all these recipes is the decorations look so complex, and you wouldn't think of trying to duplicate them. But, then you see the explanations of each, and they are actually so simple!


These are just a heart cut from a thick piece of pound cake, dipped in frosting, and plopped on top of a cupcake. Then decorated with red frosting. I like this!

Stay tuned for all our Valentine projects!! So there.

AddThis