Thursday, November 1, 2012

Pumpkin Forest

From branches forest to pumpkin forest!

I got so excited (SO. excited. !!!) about all the craft ideas I saw for Halloween, and went a little crazy Pinning decorative pumpkin ideas to my Pinterest page.

So, of course, I went around town scouring deals (did you know Michael's tries to sell them regular price for $24?! HA!...no thanks.) on all sizes of decorative pumpkins, and set up shop.
I found mine at Walmart, Michael's with a 40% off coupon, the Dollar Tree, and then later Michael's had the little guys 60% off, so I grabbed a few more.
I love decorating fake pumpkins so I can store them and re-use year after year.


These little guys I brought back out of hiding from last year, and am still loving.


Here is a run down of ALL the ideas I tried out!

Basically Lauren Conrad and I had all the same ideas from Pinterest, per her blog post ;)

Crayon wax dripping
Source: The Swede Records


I bought crayons in coordinating colors I liked, peeled off the wrappers, and used a long handled lighter to melt and drip the wax on the top and down the sides.


Tack Monogram
Source: All in a Day


This pumpkin was already a deep metallic orange, so I decided not to paint it.
I just mapped out where I wanted my monogram to be and stuck in the thumb tacks. Easy Peasy!
The linked blog uses a printed out template...you should probably do that, but I just winged it.
I added a bit of ribbon at the stem, too!


Burlap
Oh, burlap, I am obsessed with you lately.
I bought this wide roll to make a table runner, and used a strip of it around a pumpkin I had done half metallic, half natural orange.


Metallic
                                         This one I cheated, and just used a metallic silver spray paint.
Next year I want to actually buy this faux mercury glass spray paint and make ones that look more like these overpriced  Pottery Barn pumpkins. I've seen this paint used on vases and candle holders, too. That would look really cool.


Yarn Wrapped


Two Shades of Pink has a great tutorial for several different methods of these adorable yarn wrapped pumpkins.
I chose a multi colored strand yarn and went to town, wrapping and gluing.
A few dozen hot glue burns later, and voila!


Twine Wrapped
Same idea as the yarn wrapped...


Black and White


Source: Radio Butlers

Since I already had the monogram made in thumb tacks, I just decided to paint a big peace sign instead of a letter, while still keeping with the black and while theme. I painted this (off white) pumpkin bright white, and added the design in a black paint.


The other side of the pumpkin is painted with black chalkboard paint! I like this idea, too!
Source: Home Made Simple


I had to cut myself off, but I'd love to try these other ideas next year :)

Gem, stud, and rhinestone pumpkins, oh my!!


Source: Unknown from Pinterest and Small Shop Studio


This Ombre pumpkin from Funky Time is to die for!!


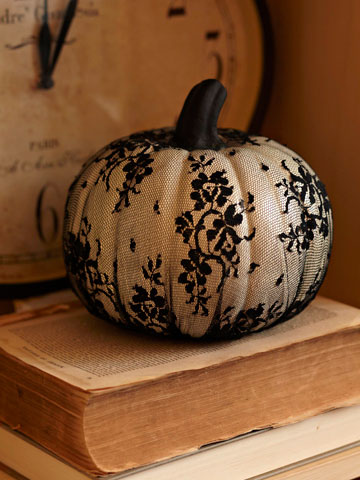
Better Homes and Gardens shows a cool idea of using printed lace to wrap a pumpkin. I saw somewhere on Pinterest you could also use lace pantyhose or tights for this!


Vitamini Handmade created a fabulous zebra print pumpkin. This looks like it'd take a bit of patience.


I am pretty excited about all my little pumpkins. We can officially say my house is decorated for Halloween!
Which ideas have you tried?


Happy Halloween!
So There.

Tuesday, October 30, 2012

Bringing the Forest Indoors

After finding so many craft ideas on Pinterest using tree branches, I convinced my lovely parents to bring some branch clippings with them on their upcoming visit from their home in the forest of Northern California.
My sweet Dad took the time to perfectly locate and trim up great size branches from not one, but THREE different local trees: oak, manzanita, and apple. Isn't he the BEST?!
I was so thrilled!

I still have yet to use them all; I keep meaning to cover a few vases and pillar candles in short branches, as shown here.


And how pretty and simplistic is this?!


One more - the lamp!!


But, my main project I did complete was a wall sculpture of glitter branches and yellow flowers, entwined with mini twinkle lights. Right??!! I was so excited.

I sprayed the branches with a metallic bronze glitter spray paint to give a subtle sparkle, per this idea here.

Then, I attached the glitter branches, (GLITTER BRANCHES!!) coupled with sprigs of silk flower branches, to the wall using these "U" brackets found at Home Depot in the pipes/plumbing section.

 I used smaller brackets than I originally assumed I'd need - if the grouping of branches in each didn't completely fill the U bracket, the branches didn't stay in their correct position, and they slid out of the brackets. It took a bit of work, but it was so worth it!


Then, to finish it off, I purchased some really cool twinkle lights, on thin copper wiring, thank you Restoration Hardware, and wove them through the branches, twisting the copper wire through the branches to secure.


The lights are battery operated, and can be on a timer.

Check out the finished project!


My own little twinkle light forest-y wonderland!
I'm in love!
So There.


Saturday, October 27, 2012

Blue Moooooooooon

Weekend posts call for booze! Haha.

What to do with an 'extra' delicious, citrusy, Blue Moon beer?

Make cupcakes of course!!


Aren't they so cute?!
These cupcakes turned out great - the carbonation keeps them SO light and fluffy, plus, they have a nice hint of the citrus and wheat from the beer.


Thanks to Miss Make for the recipe, which I found on Pinterest.

CLICK HERE for the full recipe with instructions on her blog.

I actually was too chicken to make a frosting with egg whites, so I used this Orange Buttercream Frosting Recipe instead, from Real Mom Kitchen's blog.

Has anyone ever made the egg white frosting? I'm afraid of, like, salmonella or something!

But, either way, you MUST make these cupcakes! Yum!

I thought I'd also share my tip for frosting cupcakes with a piping bag.
One of my friends recently Pinned this tip on Pinterest, but I have actually been using it for awhile now, so I wanted to make sure you knew about it, too!!

Now, you can totally use a plastic zip top bag as a piping bag, but I have bad luck with them busting a hole in them, so I buy these great disposable (Sorry, Mother Earth, these bags are SO are to clean and re-use, with the greasy butter frosting residue) piping bags in the baking section of Michael's, and they work great. I also have 4 or 5 metal piping tips I got from that same aisle.
I used a medium round tip for these cupcakes.

Sorry, on to the TIP!
I take a tall drinking glass, and stick the piping bag, tip first, down in it, folding the top edges over the rim of the glass.
Then, you can easily spoon the frosting into the bag, without making a globby mess all over the counter!


Speaking of Blue Moon, I went to the store looking for the Seasonal Pumpkin Ale variation of the beer, and found this intriguing variety pack I had to try! I'm a sucker for a variety pack.


After sampling all four beers...see how dedicated I am?...I can write my review!
I really love the Belgian-Style Pale Ale, similar to a Hefeweizen or something, but the Pumpkin is a little too odd for me.  I'd like to try the other brands of Pumpkin Ale, though, to give the seasonal treat a fair chance. After all, have you HEARD how obsessed with pumpkin I am?!?!
The Caramel Apple was what really sold me on this pack.  I was picturing hard apple cider, but with fall spices or something. It has a hint of caramel sweetness, but it is very similar to the Pumpkin, in that it is a bit strange to me. Bummer!

I AM considering making a spiced cupcake with one of these seasonal beers, though! Perhaps with a pumpkin spice or cinnamon frosting. I think that'd be great!

I'd like to give a shout out to my good friend Jacqueline over at Bake It With Booze, who recently featured my blog on her site! She has some amazing looking Pumpkin Spice Cupcakes with Buttered Rum Frosting you have got to check out! I'd like to try these with this pumpkin beer in the cupcake batter, too!
I also keep meaning to try and make her Beer Bread recipe, too!

Cheers!
So There.


Now linking here!

Thursday, October 25, 2012

Nobody's Gonna Lay a Finger...

Butterfinger candy bars are my ultimate favorite!


So, when I saw Homemade Butterfinger candy on Pinterest, I knew I had to try them out!
The cool thing about them is they are only made from 2 ingredients: candy corn, and peanut butter!
So, after Halloween, this would be the perfect recipe to use up leftover candy corn!


See the full recipe and instructions at the above link.

First, you melt the candy in the microwave, until liquefied and bubbling.


Then, immediately stir in the peanut butter.
Before it cools, aka turns rock hard and glues itself to the bowl (If this does happen, just return to microwave, to try to soften again), quickly spread the mixture into a parchment-lines pan, and allow to completely cool.


The mixture turns very crispy like the inside of a Butterfinger! One batch I made, had a bit too much peanut butter to the candy corn ratio, and ended up a bit more like Homemade Reese's...NOT a bad thing, haha.
Let cool completely, and cut the cooled candy into squares or rectangles.

Melt chocolate chips or candy melts (I used a combo of both) and dip each candy piece into chocolate.
Allow those to set and harden at room temperature, or in the fridge.


Crispety, Crunchety, Peanut Buttery!!


So There!

Friday, October 19, 2012

A Pinteresting Weekend

I had a recent weekend full of Pinterest craft projects!

First, I used an inexpensive storage bin to create a craft ribbon holder. For my hair clips that I make (shameless plug), I use a lot of different colors of ribbon. I was finding myself in need of a good way to store all the spools, when I came across this great idea.


http://www.ohcrafts.net/decoration-ribbon-organizer.php

I measured the holes in the basket, and bought a thin, wodden dowel at the craft store, to cut into sections slightly wider that the bin.  I fed these though a couple rows of the holes, and hung the ribbon spools.


And.....organized!

Next, I saw the idea to use tera cotta pots to make a cake plate-style piece to hold soap and toiletries on the bathroom counter.
I bought a terra cotta pot the height that I wanted my final piece to be. Then, I also got a terra cotta plate/dish that was the right width I needed.
I painted the pieces first, a fun, bright yellow.
I then used a metallic copper and matallic silver (leftover from this project!) paint to accent and 'antique' the piece, to give it some character.
Once dry, I attached the two pieces with Gorilla Glue, using the tutorial found here.

http://sweetcharli.blogspot.com/2010/05/diy-terra-cotta-cake-stand.html

Voila!! Cake stand turned bathroom counter storage.


Finally, I had several clear glass vases that were a bit tired and needed some sprusing up! They all three had interesting shapes, but needed some color!
One three-sided vase I chose to wrap with twine, hot gluing along the way to secure.
http://teachcraftlove.blogspot.com/2011/11/fall-table-decor.html


The other two vases, I painted, using the technique found here of painting the inside of the vase, instead of the outside. I painted one a bright turquoise, and the other I used a sunny yellow.

Craft weekend =  a success!!
So there!

Saturday, October 13, 2012

Pumpkin-palooza!

To say I am a little obsessed with all things Pumpkin lately, would be the understatement of the season...but I doooon't caaaaaaare!!!!!
I dove full force into Fall Decor and Food and I'm not coming up for air until February :)
So There.

Trader Joe's has an abnormally large amount of seasonal pumpkin products right now, which I was ALL over.
I still want to go back for the pumpkin breakfast bars, and perhaps some ice cream.

The pumpkin cream cheese spread is amazing, you can almost (I absolutely did) eat it plain, but it is wonderful on toast...or a bagel, or pumpkin bread.
I love pumpkin butter, which, if you've never had it, isn't actually butter, but, more like a concentrated applesauce type spread, with great sweetness and spicy flavor. I drizzle this over pumpkin pancakes or the toast with the cream cheese.
I actually liked the greek yogurt, but it is not overly sweet, like pumpkin pie; rather very much a yogurt taste, with a lot of nutmeg.
The macarons are pretty typical, but fabulous nonetheless. They come from the freezer section, and should sit out and thaw about 30min before serving (who has time for that?! Perhaps, if I had, my rating may have been even higher)
Pumpkin Chai Tea mix is lovely, very much a combo between a Starbucks PSL (Pumpkin Spice Latte, duh!) and their Chai Tea Latte.  It definitely is very sweet; I prefer this as an evening dessert (Yeah, I drink caffeine after 3pm, heck, after 9pm, and sleep just fine. *Shrug*), rather than to replace my morning English Breakfast tea. Too sweet for me first thing in the morning.
I know, I know, as much as I love desserts, I drink hot tea plain with no milk or sugar. I don't like overly sweet drinks, only food!
The pumpkin puree, I added to pancakes this morning, and made a yummy concoction by also adding sliced banana, diced apples, oats, lots of vanilla and pumpkin pie spice, as well as cream cheese to the whole wheat pancake batter. These pancakes I served (surprisingly!) with a drizzle of pumpkin butter and a dollop of pumpkin cream cheese. YUM! I love weekend breakfasts!

So, last on my Trader Joe's list is the ravioli, which I plan on having for dinner very soon.
The honey roasted flavor sounds amazing...I have been trying to decide what type of sauce to pair the pasta with.
World Market sells a pumpkin sauce made to serve over pasta, but I am also thinking a browned butter (with sage or rosemary?) topped with ricotta cheese and a honey drizzle might be nice, too. TBD.

Next up, a tutorial run down of my little Pumpkin Forest I've created!


AddThis