Thursday, November 8, 2012

Chai Spiced Mashed Sweet Potato!

I pinned these chai spiced sweet potatoes awhile ago, and my friend luckily reminded me about them this week, right when I had just bought some sweet potatoes!
OMG, you guys, they are SO good!!

[ By the way, this said friend has an amazingly pretty line of invitations at her site One Handspun Day. They are handpainted and sold as printables for customized use. Check them out over at her site! ]

The link above to the actual recipe from Oh My Veggies uses vanilla coconut milk, brown sugar, and chai spices, which sounds divine; and also recommends you bake the raw potatoes in the oven.  Buuuuuut, I didn't have any milk (at all) on hand, and was starvin' marvin, wanting to eat soon, so I totally cheated in every aspect.


(pictured: brown sugar, I didn't even end up needing to add.)

I poked a few holes with a fork in 1 medium sweet potato, and microwaved for 4-5 minutes.

Meanwhile, I boiled a bit of water (1/2 cup?) in a pan, and made a concentrated chai tea, with a powdered vanilla honey chai mix that has powdered milk in it.
I also threw in a bit of my pumpkin spice chai mix from Trader Joe's, because, seriously, why not!

Boil the tea mix for a few minutes so it cooks down a bit, I added a bit more ginger, too, then pour into a mug and set aside.

Then, scoop out the potato flesh, and add into the, now empty, hot pan that the chai was in.
Now, while whisking, add a bit of the chai mix a little at a time, incorporating as you go, until the consistency is right. 
and.....done!!
I topped with a bit of ricotta cheese, to tell myself this was dinner, and not dessert!!

These were so, so good.
Taste just like a warm, spiced chai latte, but, you know, with the awesomeness of sweet potato!


I realize this photo doesn't do them justice, but you've got to just trust me on this one.

Everyone who loves chai tea, should really make these immediately!
Yum!
So there.

Give Thanks. So There.

Well, on to the next Holiday!

But, if you have leftover candy from Halloween (or leftover Butterfinger from the recipe I made here!) make sure to try one of these yummy desserts!!


Source: http://www.sixsistersstuff.com/2011/08/butterfinger-blondies.html

Source: http://www.couponingncooking.com/2012/10/butterfinger-fudge.html


On to Thanksgiving! I am loving the fall decor using indian corn that I have seen on Pinterest lately.
I heard they have some at Sprouts...I may just buy up their whole supply and try making one of these wreaths or centerpieces!

Source: http://yourcozyhome.blogspot.com/2011_10_01_archive.html


Source: http://authentica-itsaboutbeingreal.blogspot.com/2011/09/time-to-get-corny.html

Happy Fall!
So there.

Saturday, November 3, 2012

Headboard Project

I wanted the look of a headboard on the wall behind my bed, so obviously, I turned to Pinterest for some inspiration.


When I didn't have any large wood scrap lying around..... ;)
I decided on something like the latter two photos.

I bought a bunch of wood-framed mirror squares from Ikea, and actually covered them in slightly larger squares of fabric, securing with hot glue.


I used several different mixed prints of fabric, that I felt all worked together, and once glued down, worked out a pattern that I liked.
You could add a layer of batting to make them softer and more plush-looking.

Note: I liked the look of actually leaving a couple mirrored squares as is.

I then hung each with a picture hanger nailed to the back of the wood frames.
Using this neat trick (found on Pinterest, duh!) to hang the frames.


Unique collage headboard! So there.

Thursday, November 1, 2012

Pumpkin Forest

From branches forest to pumpkin forest!

I got so excited (SO. excited. !!!) about all the craft ideas I saw for Halloween, and went a little crazy Pinning decorative pumpkin ideas to my Pinterest page.

So, of course, I went around town scouring deals (did you know Michael's tries to sell them regular price for $24?! HA!...no thanks.) on all sizes of decorative pumpkins, and set up shop.
I found mine at Walmart, Michael's with a 40% off coupon, the Dollar Tree, and then later Michael's had the little guys 60% off, so I grabbed a few more.
I love decorating fake pumpkins so I can store them and re-use year after year.


These little guys I brought back out of hiding from last year, and am still loving.


Here is a run down of ALL the ideas I tried out!

Basically Lauren Conrad and I had all the same ideas from Pinterest, per her blog post ;)

Crayon wax dripping
Source: The Swede Records


I bought crayons in coordinating colors I liked, peeled off the wrappers, and used a long handled lighter to melt and drip the wax on the top and down the sides.


Tack Monogram
Source: All in a Day


This pumpkin was already a deep metallic orange, so I decided not to paint it.
I just mapped out where I wanted my monogram to be and stuck in the thumb tacks. Easy Peasy!
The linked blog uses a printed out template...you should probably do that, but I just winged it.
I added a bit of ribbon at the stem, too!


Burlap
Oh, burlap, I am obsessed with you lately.
I bought this wide roll to make a table runner, and used a strip of it around a pumpkin I had done half metallic, half natural orange.


Metallic
                                         This one I cheated, and just used a metallic silver spray paint.
Next year I want to actually buy this faux mercury glass spray paint and make ones that look more like these overpriced  Pottery Barn pumpkins. I've seen this paint used on vases and candle holders, too. That would look really cool.


Yarn Wrapped


Two Shades of Pink has a great tutorial for several different methods of these adorable yarn wrapped pumpkins.
I chose a multi colored strand yarn and went to town, wrapping and gluing.
A few dozen hot glue burns later, and voila!


Twine Wrapped
Same idea as the yarn wrapped...


Black and White


Source: Radio Butlers

Since I already had the monogram made in thumb tacks, I just decided to paint a big peace sign instead of a letter, while still keeping with the black and while theme. I painted this (off white) pumpkin bright white, and added the design in a black paint.


The other side of the pumpkin is painted with black chalkboard paint! I like this idea, too!
Source: Home Made Simple


I had to cut myself off, but I'd love to try these other ideas next year :)

Gem, stud, and rhinestone pumpkins, oh my!!


Source: Unknown from Pinterest and Small Shop Studio


This Ombre pumpkin from Funky Time is to die for!!


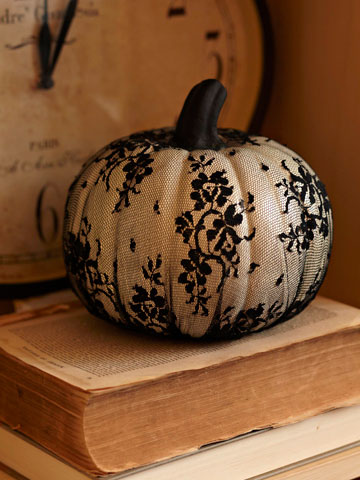
Better Homes and Gardens shows a cool idea of using printed lace to wrap a pumpkin. I saw somewhere on Pinterest you could also use lace pantyhose or tights for this!


Vitamini Handmade created a fabulous zebra print pumpkin. This looks like it'd take a bit of patience.


I am pretty excited about all my little pumpkins. We can officially say my house is decorated for Halloween!
Which ideas have you tried?


Happy Halloween!
So There.
Tuesday, October 30, 2012

Bringing the Forest Indoors

After finding so many craft ideas on Pinterest using tree branches, I convinced my lovely parents to bring some branch clippings with them on their upcoming visit from their home in the forest of Northern California.
My sweet Dad took the time to perfectly locate and trim up great size branches from not one, but THREE different local trees: oak, manzanita, and apple. Isn't he the BEST?!
I was so thrilled!

I still have yet to use them all; I keep meaning to cover a few vases and pillar candles in short branches, as shown here.


And how pretty and simplistic is this?!


One more - the lamp!!


But, my main project I did complete was a wall sculpture of glitter branches and yellow flowers, entwined with mini twinkle lights. Right??!! I was so excited.

I sprayed the branches with a metallic bronze glitter spray paint to give a subtle sparkle, per this idea here.

Then, I attached the glitter branches, (GLITTER BRANCHES!!) coupled with sprigs of silk flower branches, to the wall using these "U" brackets found at Home Depot in the pipes/plumbing section.

 I used smaller brackets than I originally assumed I'd need - if the grouping of branches in each didn't completely fill the U bracket, the branches didn't stay in their correct position, and they slid out of the brackets. It took a bit of work, but it was so worth it!


Then, to finish it off, I purchased some really cool twinkle lights, on thin copper wiring, thank you Restoration Hardware, and wove them through the branches, twisting the copper wire through the branches to secure.


The lights are battery operated, and can be on a timer.

Check out the finished project!


My own little twinkle light forest-y wonderland!
I'm in love!
So There.


AddThis